Lavender has a reputation for being fussy, but the truth is simpler: it just wants the opposite of what most garden plants want. Skip the rich, moist soil and heavy feeding, and lavender rewards you with fragrant purple blooms, silvery foliage, and a plant that shrugs off drought once it’s settled in.
Get the site and soil right from the start, and lavender becomes one of the lowest-maintenance plants in the garden — perfect for a sunny, dry corner where little else thrives.
Choose the Right Lavender Variety
English Lavender (Lavandula angustifolia) — The most cold-hardy type, reliable down to Zone 5. Compact, classic purple spikes, and the best choice for culinary use and sachets. Varieties: Hidcote, Munstead.
Lavandin (Lavandula x intermedia) — A hybrid between English and Portuguese lavender. Larger plants with longer stems and higher oil content, popular for dried bouquets and sachets. Slightly less cold-hardy than English lavender, generally reliable in Zones 5–9.
Spanish Lavender (Lavandula stoechas) — Distinctive blooms with rabbit-ear-like petals on top, blooms earlier in the season. Less cold-hardy (Zones 7–9) and more ornamental than culinary.
French Lavender (Lavandula dentata) — Toothed, fragrant gray-green leaves and a longer bloom season in mild climates. Least cold-hardy of the common types (Zones 8–10); often grown as an annual or container plant in colder zones.
Best bet for most home gardeners: English lavender, especially Hidcote or Munstead. It’s the most cold-tolerant, most versatile for cooking and crafts, and the easiest to find at garden centers.
When to Plant Lavender
- Spring planting (recommended): Plant 2–3 weeks after your last frost date, once the soil has warmed and dried out from winter moisture
- Fall planting (mild-winter zones 7–9): Can also be planted in early fall, giving roots time to establish before winter
- Avoid planting in late fall or winter in colder zones — young plants need a full growing season to establish before facing frost
Not sure of your zone? Check the Find Your Zone guide to confirm lavender is a good fit for your climate.
Soil and Site — The Most Important Factor
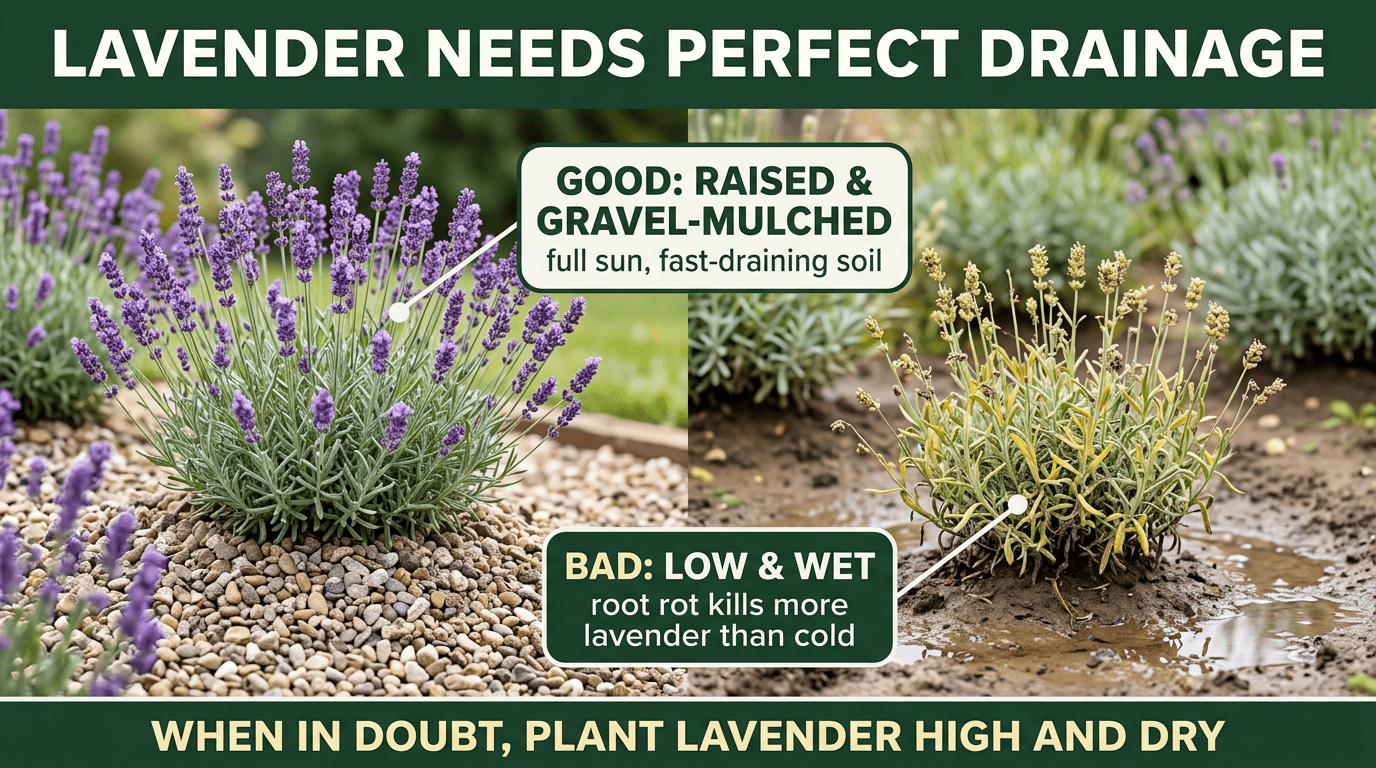
More lavender plants die from poor drainage than from cold or neglect. Getting the soil right matters more than almost anything else in this guide.
- Choose a spot with full sun — at least 6–8 hours of direct sunlight daily
- Soil must drain extremely well; lavender roots rot quickly in heavy, wet, or clay-rich soil
- If your soil is heavy clay, plant lavender in a raised bed or mound, or work in coarse sand and gravel to improve drainage
- Aim for a neutral to slightly alkaline pH between 6.5 and 7.5 — quite different from most vegetables
- Skip the compost at planting time. Rich, fertile soil produces leggy, weak growth with fewer blooms — lavender actually prefers lean soil
- Use gravel or stone mulch around plants rather than organic mulch like straw or bark, which holds moisture against the stems and encourages rot
Planting Lavender
- Dig a hole slightly wider than the root ball, but no deeper
- Set the plant at the same depth it was growing in its container — planting too deep encourages stem rot
- Space plants according to variety: 18–24 inches apart for compact English varieties, up to 36 inches for larger lavandins
- Backfill with native soil (skip the compost), firm gently, and water thoroughly once at planting
- Top with a layer of gravel or light-colored stone mulch, keeping it a couple inches back from the stem
Watering Lavender
Lavender’s drought tolerance is its superpower, but it needs support to get there.
- First year: Water deeply once a week to help roots establish, allowing soil to dry out between waterings
- After establishment: Mature lavender needs very little supplemental water — often just occasional deep watering during extended dry spells
- Always let the soil dry out between waterings; lavender would rather be too dry than too wet
- Reduce or stop watering established plants in regions with regular rainfall — overwatering is a far bigger risk than underwatering
Fertilizing Lavender
Lavender is one of the few garden plants that genuinely prefers to be left alone when it comes to feeding.
- Skip fertilizer at planting and in most cases afterward — lavender grown in lean, well-draining soil rarely needs feeding
- If growth seems weak, a light application of low-nitrogen fertilizer in early spring is enough
- Avoid rich, high-nitrogen fertilizers — they produce soft, floppy growth and fewer flowers, and increase susceptibility to disease
Pruning Lavender — Essential for Longevity
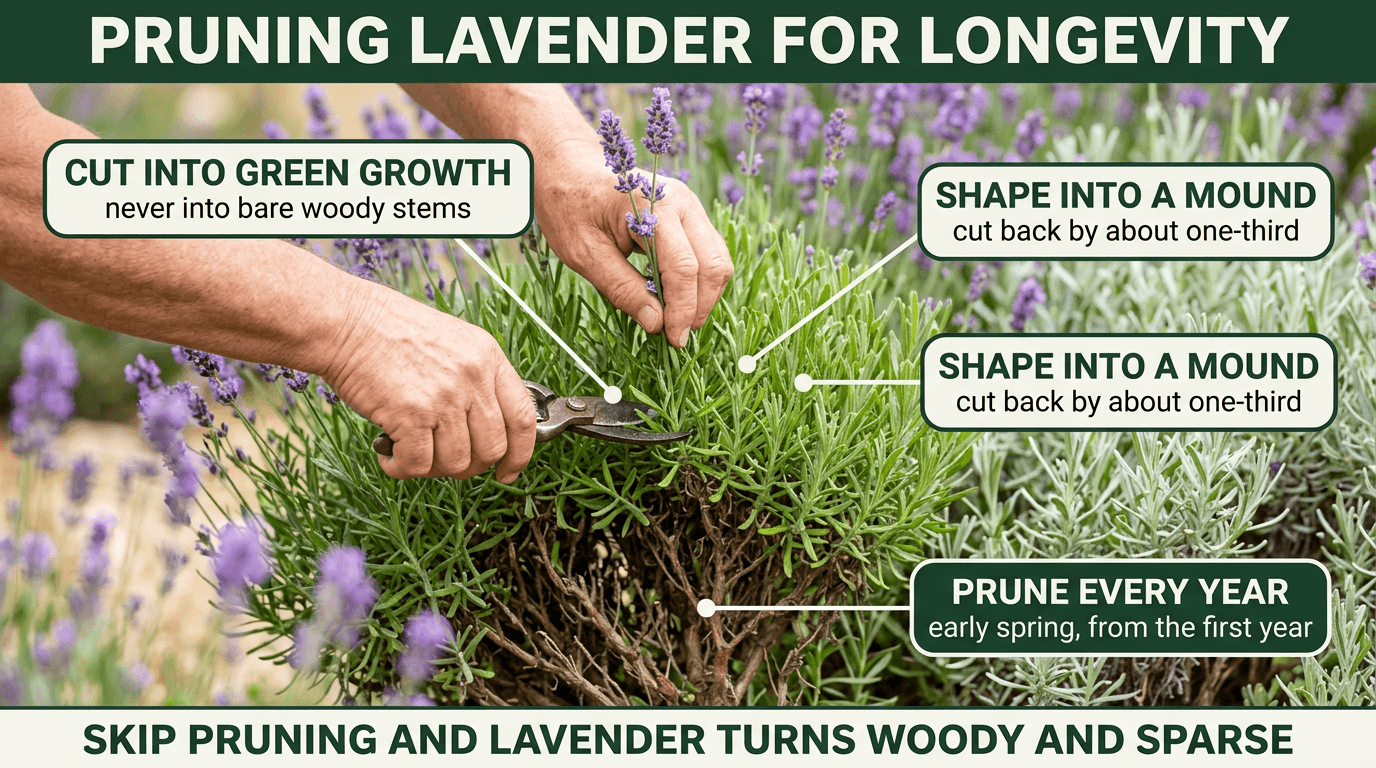
Without regular pruning, lavender plants become woody, sprawling, and sparse within a few years. Pruning is the single most important maintenance task for keeping plants compact, healthy, and full of blooms.
- After the first bloom flush (typically mid-summer), shear off spent flower spikes along with about an inch of foliage to encourage a second flush of blooms in many varieties
- Main annual prune — early spring, just as new growth begins: cut the plant back by about one-third, shaping it into a rounded mound
- Never cut into old bare wood — established lavender rarely regrows from leafless, woody stems. Always leave some green growth on every stem you prune
- Consistent yearly pruning, started from the plant’s first year, prevents the woody, leggy look that shortens lavender’s lifespan
Common Lavender Problems
Root rot — By far the most common problem, almost always caused by poor drainage or overwatering. Yellowing, wilting, or a mushy base are warning signs. Prevention through proper soil and watering is far more effective than treatment once rot sets in.
Legginess and woody growth — Caused by skipping regular pruning. Established woody plants are difficult to rejuvenate; consistent annual pruning from the start is the best prevention.
Septoria leaf spot — Dark spots on leaves, more common in humid conditions or crowded plantings. Improve airflow with proper spacing and avoid overhead watering.
Spittlebugs — Small insects that produce foamy “spit” masses on stems. Mostly cosmetic; a strong spray of water usually dislodges them.
Good news for pest control: Lavender’s aromatic oils naturally repel many garden pests, including deer and rabbits, making it a low-trouble plant overall — and a useful companion near vegetable gardens.
Harvesting Lavender
- When to harvest: Cut flower stems when about half to three-quarters of the buds on each spike have opened — this is when fragrance and oil content peak
- Best time of day: Harvest in the morning, after dew has dried but before the heat of the day, when essential oil concentration is highest
- Cut stems with clean shears, taking long stems for bundling if you plan to dry them
- Regular harvesting through the season encourages more blooms, similar to deadheading
Drying and Storing Lavender
- Air drying: Gather cut stems into small bundles, secure with a rubber band, and hang upside down in a warm, dark, well-ventilated spot. Drying takes about 2–4 weeks.
- Why dark matters: Direct sunlight fades both the color and the fragrance of drying lavender — a dark space preserves both much better.
- Storing dried buds: Once fully dry, strip buds from the stems and store in an airtight jar away from light and heat. Properly dried and stored, lavender retains fragrance for 1–2 years.
- Uses: Dried lavender works well in sachets, potpourri, homemade soaps, and — for English lavender varieties — teas and culinary dishes.