Onions are one of the most forgiving crops you can grow — and one of the most rewarding. A single small bed can produce dozens of bulbs that store all winter long, adding flavor to soups, roasts, and everyday cooking for months after harvest.
The key to great onions isn’t complicated, but it does depend on getting a few details right: the type you plant, when you plant it, and how much sun and space it gets. This guide walks through all of it, from seed to storage.
Choose the Right Onion Type for Your Region
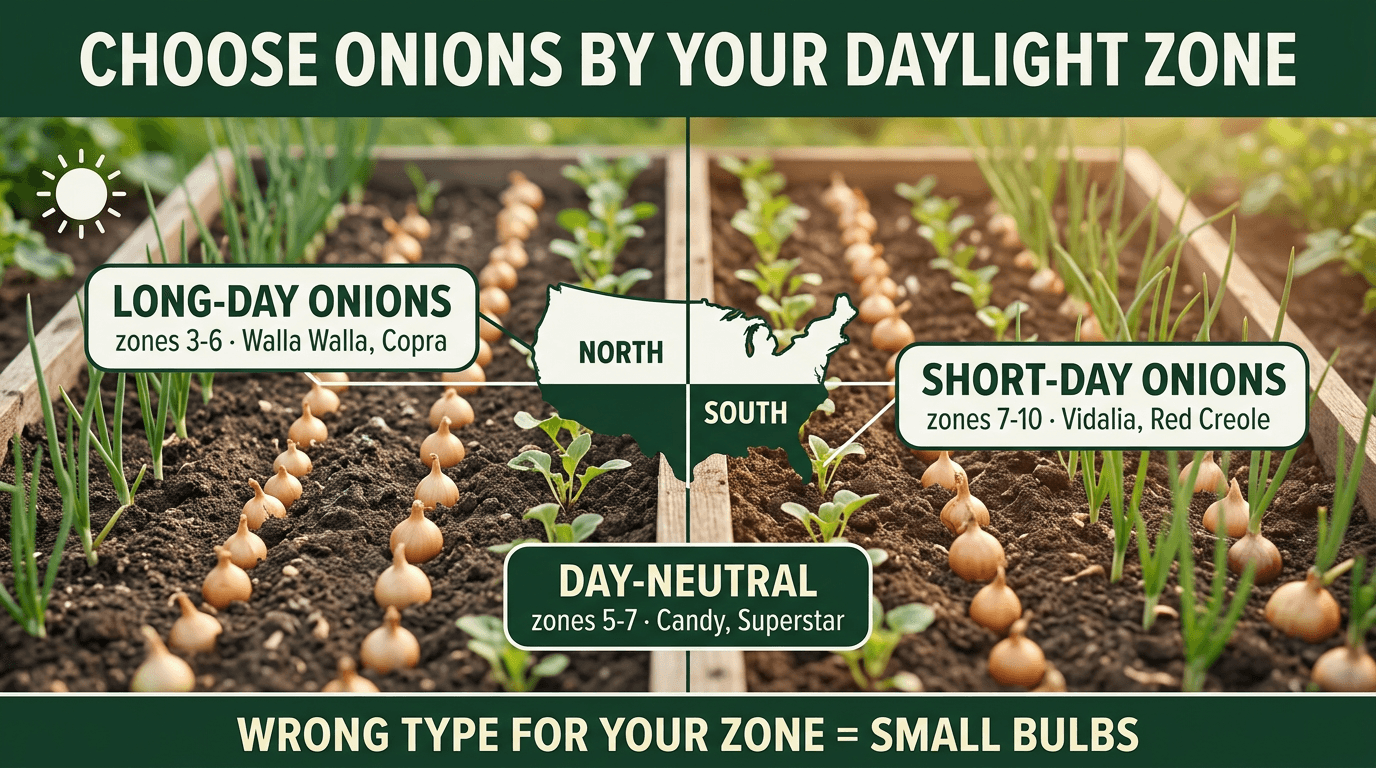
Here’s the single most important thing to know about growing onions: they form bulbs based on day length, not temperature. Choosing the wrong type for your latitude means you’ll end up with small, disappointing bulbs no matter how well you tend the plants.
Long-day onions — Need 14–16 hours of daylight to form bulbs. Best for northern gardeners, roughly USDA Zones 3–6. Varieties: Walla Walla, Yellow Sweet Spanish, Copra.
Short-day onions — Need only 10–12 hours of daylight. Best for southern gardeners, roughly USDA Zones 7–10. Varieties: Texas Sweet, Vidalia, Red Creole.
Day-neutral (intermediate-day) onions — Form bulbs regardless of day length, forming a reliable middle ground. Best for gardeners in Zones 5–7 who fall between the long-day and short-day zones. Varieties: Candy, Superstar.
Not sure which zone you’re in? Check the Find Your Zone guide, then match your zone to the day-length type above before you buy seeds or sets.
Seeds, Sets, or Transplants — Which Should You Use?
You have three ways to start onions, each with its own trade-offs:
Sets (small dormant bulbs) — The easiest and most beginner-friendly option. Just push them into the soil. They mature faster than seeds and resist disease well. Downside: fewer variety choices, and sets are more prone to bolting (flowering early) if exposed to a cold snap after planting.
Transplants (young seedlings) — A good middle ground. Available at most garden centers in early spring. Larger bulbs than sets typically produce, with less bolting risk.
Seeds — The most work, but the widest variety selection and the largest bulbs at harvest. Must be started indoors 8–10 weeks before your last frost date, since onions need a long growing season.
Best bet for most home gardeners: Start with sets. They’re forgiving, inexpensive, and available at almost every garden center and hardware store in early spring.
When to Plant Onions
Onions are a cool-season crop planted early — they can handle a light frost and actually need cool weather early on to develop healthy tops before bulbing begins.
- Sets and transplants: Plant 2–4 weeks before your last spring frost date, as soon as the soil can be worked
- Seeds started indoors: Start 8–10 weeks before your last frost date, then transplant outside 2–4 weeks before that date
- Fall planting (mild-winter zones 7–10): Some short-day varieties can be planted in fall for an early summer harvest
For exact dates based on your USDA zone, see the full When to Plant Onions guide.
Preparing the Soil
Onions are shallow-rooted and need loose, well-draining soil rich in organic matter. Heavy, compacted clay leads to small, misshapen bulbs.
- Choose a spot with full sun — at least 6 hours of direct sunlight daily
- Work 2–3 inches of compost into the top 6–8 inches of soil before planting
- Aim for a soil pH between 6.0 and 6.8
- Ensure good drainage — onions left sitting in soggy soil are prone to rot
- Raised beds work exceptionally well for onions since they warm up early and drain freely
Planting Onion Sets
Planting onion sets is simple and quick — one of the easiest steps in growing any vegetable.
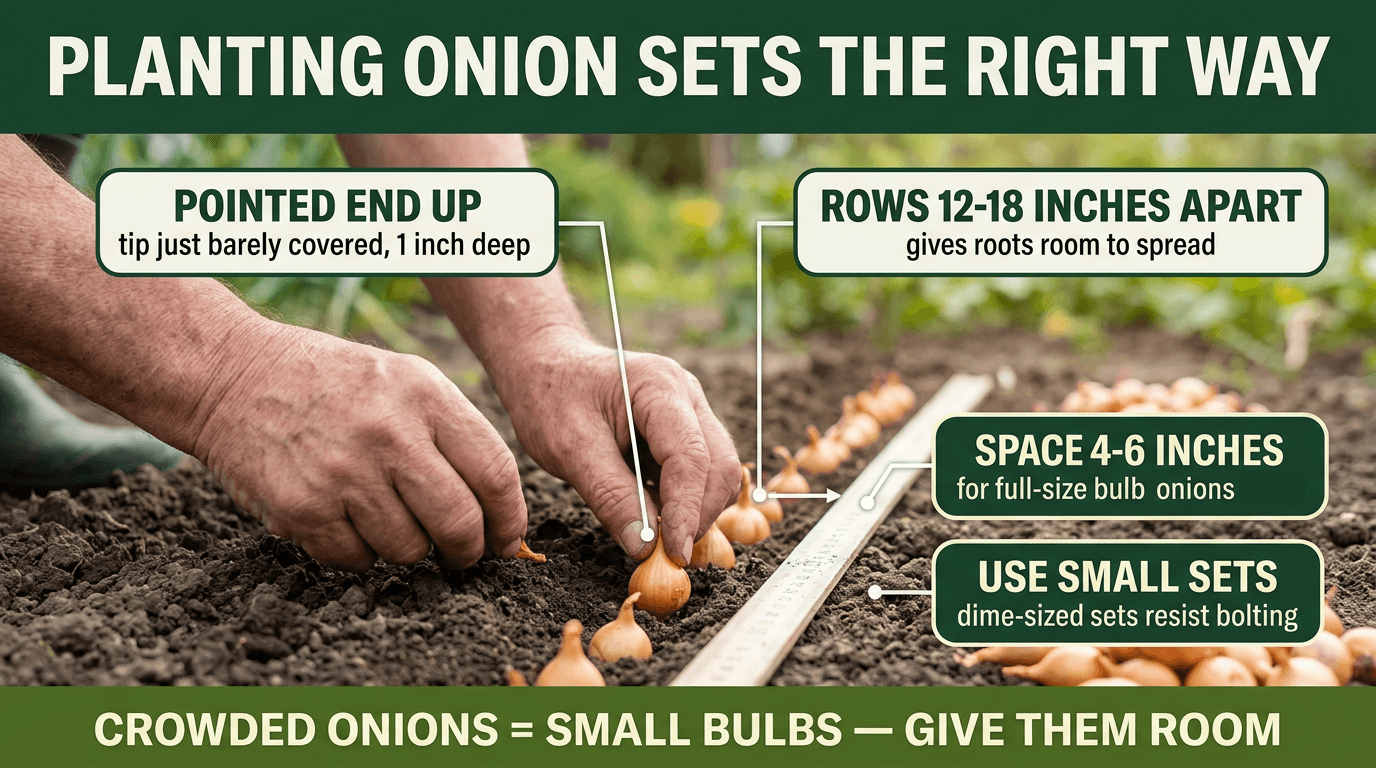
- Sort sets by size before planting: use the smallest (dime-sized) sets for bulb onions, and save larger sets for green onions since big sets are more prone to bolting
- Push each set into loosened soil, pointed end up, so the tip is just barely covered — about 1 inch deep
- Space sets 4–6 inches apart in rows 12–18 inches apart for bulb onions
- For green onions, space just 1–2 inches apart since you’ll harvest before bulbs fully form
- Water gently right after planting to settle the soil around the sets
Spacing matters more than most people expect. Crowded onions compete for nutrients and produce small bulbs. Give bulb onions the full 4–6 inches, even if it feels like a lot of empty space at first.
Watering Onions
Onions need consistent moisture, especially during bulb formation, but their shallow roots mean they can’t handle drought or waterlogging well.
- Water deeply once or twice a week, aiming for about 1 inch of water total (rain plus irrigation)
- Keep soil consistently moist but never soggy — onions rot quickly in standing water
- Reduce watering once bulbs are full-sized and the tops start to yellow and fall over — this signals the plant is finishing up
- Mulch lightly with straw to retain moisture and suppress weeds, but keep mulch pulled a couple inches back from the bulb itself
Fertilizing Onions
Onions are heavier feeders than many root vegetables, especially since they’re growing both a large bulb and substantial green tops.
- Work a balanced fertilizer (10-10-10) into the soil at planting time
- Side-dress with a nitrogen-rich fertilizer every 3–4 weeks during the early growing period to support strong top growth
- Stop fertilizing once bulbs start to swell and push up out of the soil — continued nitrogen at this stage delays bulb maturity and can reduce storage life
Weed Control — Critical for Onions
Onions have thin, shallow, sparse roots and are poor competitors against weeds. A weedy bed can cut your harvest dramatically, even if everything else is done right.
- Weed by hand or with a shallow hoe — deep cultivation damages onion roots
- Mulch helps suppress weeds without competing for moisture or nutrients
- Stay on top of weeding in the first 6 weeks after planting, when onions are most vulnerable to competition
Common Onion Problems
Bolting (flowering early) — Triggered by a cold snap after planting, especially with larger sets. Bolted onions redirect energy to a flower stalk instead of the bulb, resulting in a tough, less flavorful bulb. If you see a flower stalk forming, snip it off immediately and use that onion soon — it won’t store well.
Small bulbs — Usually caused by planting the wrong day-length type for your zone, overcrowding, or weed competition. Double-check your variety matches your latitude.
Onion maggots — Small white larvae that tunnel into bulbs, often entering through the base. Prevent by rotating onion crops each year and covering young plants with floating row cover.
Thrips — Tiny insects that cause silvery streaking on leaves. Usually cosmetic in small numbers, but heavy infestations can stunt bulb growth. Blast leaves with water or use insecticidal soap if thrips are severe.
Neck rot or soft bulbs — Almost always caused by excess moisture or poor drainage. Improve soil drainage and avoid overwatering, especially as bulbs mature.
Harvesting Onions
Onions are ready to harvest 90–120 days after planting, depending on variety. The plant itself tells you when it’s time.
Signs your onions are ready:
- The green tops naturally yellow and fall over on their own — this is the clearest signal
- Bulbs feel firm and have visibly swollen at the base of the plant
- Once about half the tops in the bed have fallen over, it’s time to harvest the whole bed
How to harvest: Gently loosen the soil around each bulb with a garden fork, then lift the onions out by hand. Avoid pulling straight up without loosening first — this can bruise or snap the bulb.
Do not harvest before the tops fall over. Onions pulled while still green haven’t finished developing their protective outer skin, and they won’t store well.
Curing and Storing Your Harvest
Curing is the step that determines whether your onions last a few weeks or several months. Don’t skip it.
How to cure onions:
- After harvesting, lay onions out in a single layer in a warm, dry, well-ventilated spot out of direct sun — a covered porch, garage, or shed works well
- Leave the tops and roots attached during curing
- Cure for 2–3 weeks, until the outer skins are papery and the necks are fully dry and tight
- Once cured, trim the roots and cut the tops back to about 1 inch (or braid the tops together for hanging storage)
Storage tips:
- Store cured onions in a cool, dry, dark place — a mesh bag, basket, or braided bunch hung in a pantry or basement works well
- Ideal storage temperature is 35–50°F with low humidity
- Well-cured storage varieties (like Copra or Yellow Sweet Spanish) can last 6–8 months
- Sweet varieties (like Vidalia or Walla Walla) have thinner skins and higher water content — they don’t store as long, typically just 4–6 weeks, so use these first
- Never store onions near potatoes — potatoes release moisture and gases that cause onions to spoil faster